Have you ever tried to remove the image background and ended up with jagged hair edges? Or struggled to cut out a shiny glass item image without losing its reflections? Many photographers, e-commerce designers, and editors face these problems when working with detailed product images. Not every image can be fixed with just one method. This is where clipping path and image masking come in. Both help to make the image clear, remove the background properly. Each method works differently from the others.
At Clipping Path Adept, our professional experts are skilled in both photo editing services. We use advanced Photoshop tools and pay close attention to detail. Whether your project needs the precision of a clipping path or the subtle touch of masking, we choose the right method. We can also combine the two to get the best results. In this blog, you will understand the differences between clipping paths and image masking.
Why Background Removal Matters in Modern Photo Editing
Today, images need to look perfect. This is especially true for e-commerce and advertising. People don’t just buy products; they notice how they are shown. A clean, distraction-free product image can catch a shopper’s eye. A messy background can make them click away. That’s why background removal is so important.
Background removal means taking the subject out of its original background. This lets editors put the product anywhere. It keeps images consistent across catalogs. It also shows product details clearly. Whether you are using clipping path services or image masking services, the goal is the same: to make the subject stand out. Background removal is more than just making pictures look nice. It enhances the product’s look. It strengthens brand identity and builds customer trust. In e-commerce, clear images can increase sales.
In advertising, they are very obvious. Using clipping path and image masking techniques, editors can replace tricky, delicate hair with soft textures, transparent parts, or smooth edges. Every image becomes ready for marketing, catalogs, or online stores.
What Is a Clipping Path?
A clipping path is a popular method in photo editing and background removal. It is a vector path that carefully traces the outline of an object. This lets editors separate the object from its background without losing any detail.
Clipping paths are important for clean, professional images. They are widely used in e-commerce, product photography, and graphic design. Clipping Path Adept offers the best clipping path services. With this service, you can achieve professional image results.
Types of Clipping Path service
- Basic Clipping Path – This usually uses a simple object with transparent edges. Great for bottles, bottles, electronics, or other common shapes.
- Complex or multiple paths – This is for objects with tricky shapes or many parts. This allows the designers to change shadows, textures, or colors. This type is best for products that need extra precision and professional finishing.
How to do a clipping path in Photoshop
Creating clipping paths in Photoshop is easy using the Pen tool. See how:
- Open Image – At first, open the image you want to edit in Photoshop.
- Select Pen Tool – Select a Pen tool from the toolbar. Better than the Brush tool for a more precise, customizable path.
- Trace an object – Follow the object closely. Click for a straight line and draw the path. Click and drag the curve.
- Close the Path – Add the endpoint to the starting position. This creates a rigid vector path around the object.
- Change the path to the selected object – right-click on the path and select “Make Selection”. This will turn the process into something you can use.
- Isolate or Remove Background – Remove or replace the rear background. You can change the object without affecting the rest of the image.
- Refine Edges – Use the Refine Edges or Selection and Masking tool to refine rough edges.
- Save your work – Save the image the way you want.
This step-by-step process will give you a clean, clear, and complete view of the product. It is suitable for professional photo manipulation.
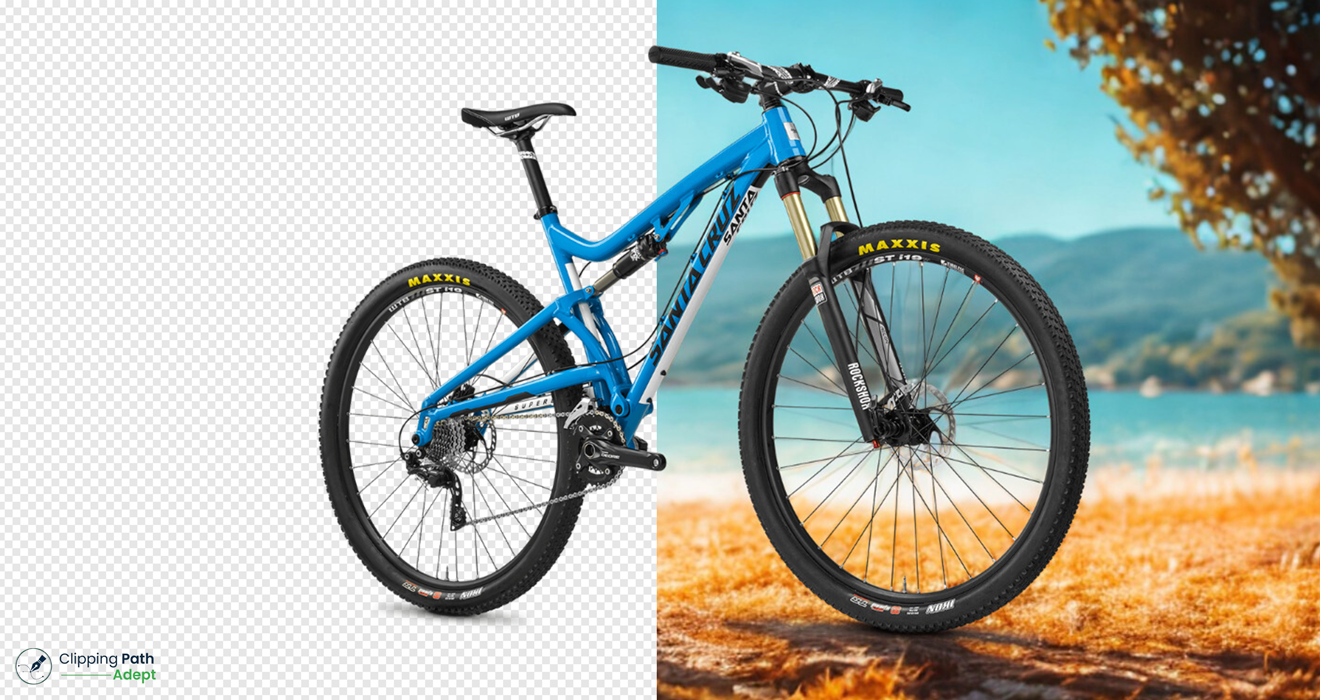
Great for simple Objects
Clipping paths work best for images that have a transparent, sharp edge. Examples include:
- Things like shoes, bags, and accessories
- Signs and logos, icons
- Boxes, packaging, and geometric shapes
For these materials, the clipping path results in a clean and professional look. This includes catalogs, online stores, and physical stores.
The importance of Clipping Paths
There are many benefits of using Clipping Paths:
- Transparent, sharp edges for a professional look
- The file size is very small compared to masking.
- These techniques are vector-based, so you can resize them without losing accuracy.
Clipping Path Limitations
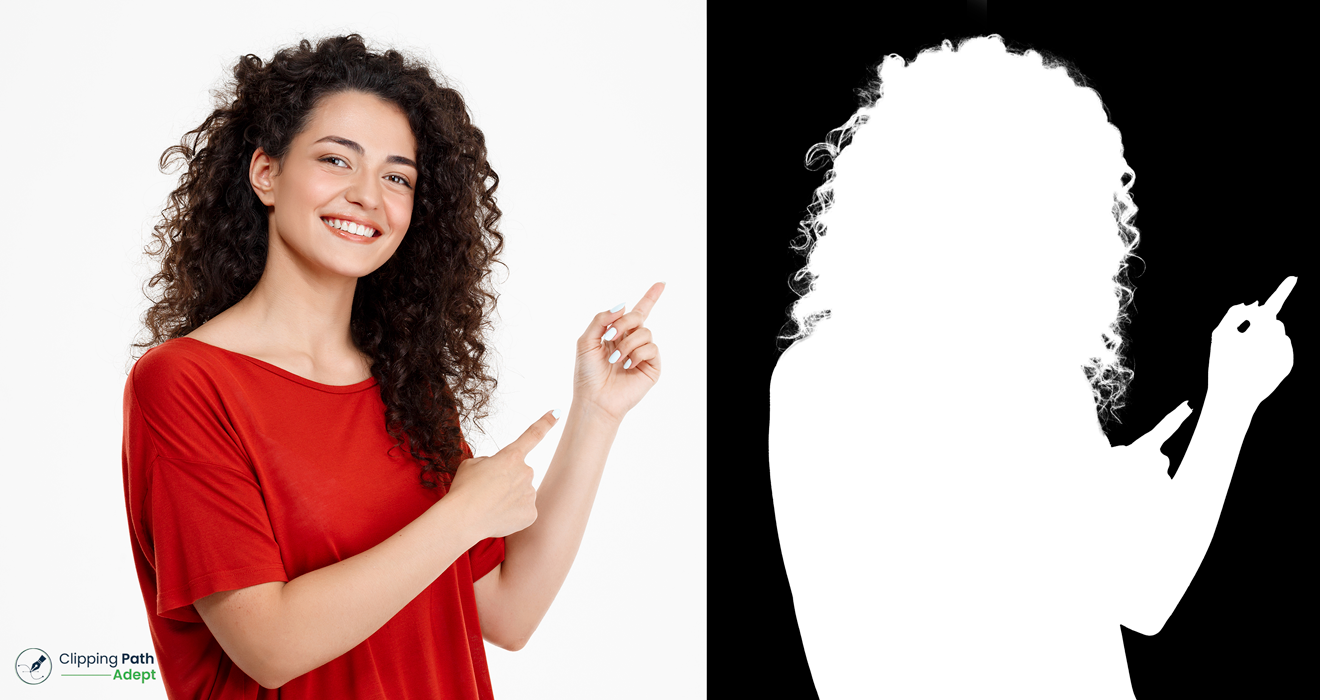
Clipping path lines isn’t good for all types of images. They don’t do a good job with soft, detailed edges. Hair, fur, feathers, or see-through objects like glass are hard to handle with a clipping path. In these cases, image masking is a better choice to keep natural details.
What Is Image Masking?

Image masking is a Photoshop technique that hides or shows parts of an image without deleting anything. Unlike a clipping path, which works best for hard edges, image masking is perfect for soft edges, transparent areas, and fine details. Masking gives editors full control over tricky areas while keeping the original image safe.
Different types of Image masking
- Layer Mask – you can hide or reveal parts of a layer without changing the original image. You can edit and make the changes again.
- Alpha Channel Masking – removing physically tricky transparency objects, such as hair, reflectors, or semi-transparent objects. The mask is stored in the alpha channel to keep fine details.
- Hair Masking – A special method for soft, delicate edges such as hair, fur, or feathers. It helps to highlight each small detail for a clear, natural image.
- Soft Edge Masking – for a smooth transition between the subject and the background. It’s a great idea to add a subject to a new background or to a specific project.
How to do masking in Photoshop
- Open your image – Open Photoshop and open the image you want to edit.
- Open Background Layer– Click the lock button on the layer bar to change the Background Layer.
- Select Objects – Use the Quick Selection, Magic Wand, or Lasso Tool to easily select objects.
- Add a Layer Mask – Click the Layer Mask icon at the bottom of the Layers panel. This will prevent unselected items from being deleted.
- Refining Masks – Go to Options > Select & Mask (or the Cleanup sections for earlier versions). Adjust Edge Detection, Smooth, Feather, Contrast, and Shift Edge to capture fine details.
- Use the Brush Tool – To select the mask, use black to hide or white to highlight the area. Clean the edges and refine details such as hair, fur, or soft objects. Adjust the size and weight of the brush to suit your needs.
- Apply a soft Edge Masking (optional) – Use a soft brush to mask the edges on the back.
- Inspect and refine – check and inspect the edges. Remove everything with a brush or pick and mask.
- Edit or Remove Background – Add a new background, make it clean, or remove elements from the group image.
- Save the work – Save as a PSD to save your mask for future use. Export as a PNG or TIFF if you want a better look.
AI-powered masking and manual correction for background
AI-powered masking helps designers isolate details, find blind spots, and focus on quality. This helps make complex background removal easier and faster, to remove contaminants by removing hair, dirt, smoke, or glass dirt. Feathering is used to soften edges, making subjects blend naturally with the background.
While AI speeds up the process and maintains fine details, manual editing is still important for full control. Editors refine edges, adjust opacity, and correct small areas to ensure perfect results. AI and manual work give high-quality outcomes for photo manipulation, eCommerce images, and any project that needs precise, professional masking.
Benefits of Image Masking
- Keeps fine details that a clipping path cannot capture, like hair strands, fur, or see-through objects.
- Lets you edit without changing the original image. You can adjust or undo changes anytime.
- Creates natural, realistic edges, perfect for professional photo editing and high-quality eCommerce images.
Drawbacks of Image Masking
- Files can be larger because pixel-level masks need more data.
- Editing can be slower than clipping paths, especially for high-resolution images or complex masks.
- Takes skill and practice. Getting natural, precise results needs both technical knowledge and a careful eye.
Clipping Path vs Image Masking – Key Differences
|
Aspect |
Clipping Path |
Image Masking |
|
Technique |
A vector path that traces objects precisely |
Pixel-based mask that hides or shows parts without deleting pixels |
|
Tools |
Photoshop Pen Tool for precise paths and curves |
Brush Tool, Refine Edge, Edge Detection, Feathering for soft details |
|
Edges |
Sharp, clear edges for hard objects |
Soft, natural edges for hair, fur, smoke, glass, or see-through areas |
|
File Type |
JPEG, TIFF, EPS – smaller files, easy for catalogs |
PSD, PNG – keeps transparency, supports re-editing |
|
Best For |
Simple objects with clear outlines (boxes, electronics, logos) |
Complex subjects with soft or tricky edges |
|
Editing Flexibility |
Less flexible once the path is made |
Non-destructive, can adjust anytime |
|
Use Case |
Quick, clean background removal for hard-edged products |
Detailed background removal for soft edges or transparent objects |
|
Output Style |
Sharp, professional, clean look |
Smooth, natural, realistic look |
|
Processing Speed |
Fast, lightweight files |
Slower, larger files due to pixel-level details |
When creating a clipping path or an image mask.
Choosing the right method is important for a clear image. The image editing process can take a long time. Knowing when to use each one can save time and lead to better results.
Use Clipping Path methods
- Simple Design – Great for simple and easy shapes, image objects
- Product images – Best for boxes, accessories, bags, and labels, and a great online store.
- White background – Perfect if you want a clean white background.
Clipping path is fast, it makes the file small, and straight edges. It’s ideal for straightforward background removal.
Use Image Masking For
- Soft or detailed edges – Hair, fur, feathers, or smoke.
- Transparent materials – Glass, plastic, or semi-transparent objects.
- Complex textures – Keep fine details for natural-looking images.
Image masking is essential for tricky backgrounds. It preserves textures, transparency and gives a realistic finish that clipping paths cannot.
Use Both For
- Portraits and fashion photos – When clothes have flowing hair or soft textures.
- Jewelry and reflective objects – Sharp edges require clipping paths, while soft or transparent edges require masking.
- Combine textures – Some scenes require vector paths, while others require pixel-level masking.
Both techniques are used to make sure that the highest-resolution images have clear, sharp, and detailed results.
Photoshop Tools That Power Both Methods
Professional background removal uses Photoshop tools for both clipping path and image masking. Experts use these tools to create clear and high-quality images easily.
- Pen tool – The Pen Tool is a great way to create paths. This allows the designers to plot the exact direction of the vector on an object. This works well for sturdy objects like tools, boxes, and tables. Input points and curves provide control for sharp, professional edges.
- Brush Tool – The Brush Tool is perfect for image masking. It lets editors hide or reveal pixels on a mask. It works well for soft edges, hair, fur, smoke, or semi-transparent objects. You can change brush size, hardness, and opacity to refine details naturally.
- Layer Mask – Layer Masks let editors hide or show parts of a layer without changing the original image. This keeps editing flexible. You can adjust anytime without losing quality.
- Alpha Channel – The Alpha Channel stores complex selections and transparency. It is useful for fine details like hair, glass, or semi-transparent objects. The designers can use the chosen source and preserve the original.
- Edge Detection Tools – Finding the edges, in conjunction with Refine Edge or Select and Mask, allows Photoshop to adjust edges automatically. This saves time and ensures separation between the subject and the background. This is great for hair, fur, smoke, or other fine details.
Combining Clipping Path and Image Masking
Professional designers combine Clipping Path and Image Masking for the best results. This integration, often referred to as clipping path masking services or clipping path image masking services, provides consistency and authenticity. It is perfect for e-commerce, fashion, jewelry, and product photography.
Cost and Outsourcing Insights – Why Choose Clipping Path Adept
Removing backgrounds is easier when you trust experts. Clipping Path Adept is a top choice for clipping path and image masking services. We serve clients in the USA, UK, and around the world. Every image is handled by skilled professionals. We use 100% manual work to make sure results are perfect.
Pricing:
- Clipping Path Services – Best for objects with clear, hard edges like boxes, electronics, and logos. Prices start at $0.45 per image.
- Image Masking Services – Best for tricky subjects like hair, fur, smoke, glass, or transparent objects. Prices start at $0.80 per image. Every image gets careful attention.
Our prices are clear and fair. Every image is checked to ensure quality.
Why Choose Clipping Path Adept
- Experience – our company has over 10 years of experience.
- 100% Manual Work – We use a manual editing process for perfect results.
- Global Operations – Clients in the US, UK, and around the world trust us.
- Quality check – Each photo is carefully checked before being exhibited.
- Affordable Pricing – Clipping paths start at $0.45 per image. Image masking starts at $0.80 per image.
With Clipping Path Adept, you get clean images, natural edges, and perfect background removal. We deliver fast, accurate, and professional results every time.
Conclusion
Understanding the difference between clipping paths and image masking is important in photo editing. Clipping Path gives sharp, clean edges. Image Masking handles soft edges, hair, fur, and transparent details perfectly. Using both techniques lets editors handle any photo. From simple product shots to complex backgrounds, your images will always look great. Clipping Path Adept offers 100% manual clipping path and image masking services. We have earned the trust of customers in the US, UK, and around the world. Each image goes through rigorous quality control to ensure the results are accurate.
Start Adept Clipping Paths now. Get sharp edges, smooth transitions, and perfectly isolated subjects. Develop your e-commerce business with the magic of our editing service.
Frequently Ask Question
Q1. What is the difference between a clipping path and a mask?
A clipping path is a vector outline used to cut out objects with sharp edges. A mask works with pixels. It can hide or show parts of an image. Masks are perfect for soft edges, hair, fur, glass, or transparent areas.
Q2. What is the difference between a layer mask and a clipping mask?
A layer mask hides or shows parts of a single layer. It doesn’t change the original image. A clipping mask uses one layer to control another. It is great for special effects or adjustments in a specific area.
Q3. When should I use a clipping mask instead of a layer mask?
Use a clipping mask when you want to apply color, effects, or edits to one layer only. It’s useful for text effects, selective edits, or combining multiple layers.
Q4. Which software do we use for clipping paths?
Adobe Photoshop is the standard choice. It has tools like the Pen Tool for precise paths. Layers, masks, and edge-refinement tools help create professional results.
Q5. What does masking mean in smart editing tools?
Masking means isolating a subject from the background. The software detects edges and soft areas automatically. It saves time while keeping details like hair, fur, or glass intact.